Most people assume urban farming requires either a lot of space or a lot of money, preferably both. I used to think that too, until I started paying attention to what I was throwing away every time I cooked dinner. The bottom trimmings of pechay, the seeds inside an overripe bell pepper, the core of a siling labuyo that had gone soft, all of it was heading for the trash, and all of it turned out to be completely viable planting material. What I am sharing in this post is not theory pulled from a gardening manual. It is the actual process I used on my balcony, in plastic containers, with scraps from my kitchen and soil I have been building for 25 years. If you have ever wanted to grow your own food but did not know where to start, start here.
Why Most Container Gardens Fail Before They Begin
The most common mistake I see in container gardening is not overwatering or underwatering or choosing the wrong plant. It is treating a container like a simple bucket of dirt and expecting it to perform like a garden bed. A container is a closed system, which means drainage does not happen automatically the way it does in open ground, and soil compaction becomes a serious problem much faster than most people expect. When water has nowhere to go, it sits at the bottom of the container, roots sit in it, and the plant slowly suffocates from below while looking perfectly healthy from above. By the time you notice something is wrong, the damage is already done and hard to reverse. The solution is not a better plant or more fertilizer. It is building the container correctly from the start, layer by layer, so that drainage and aeration are built into the structure itself.
The Soil Foundation: 25 Years of Composting
Before getting into the layering system, it is worth understanding what I am working with at the core, because it shapes everything else. My primary soil source is a composted garden base that has been building in the same spot for 25 years. Every kitchen scrap, coffee ground, dried leaf, eggshell, and piece of organic matter from our household has been going into that same spot continuously, and what comes out of it is biologically alive in a way that store-bought potting mix simply cannot replicate. The microorganisms, the texture, the nutrient density are all the result of decades of patience and the simple habit of not throwing organic matter away. If you are reading this and you do not have 25-year compost yet, and most people do not, the right response is to start your own pile today. In five years it will be dramatically better than anything you can buy, and in 25 years it will be something else entirely. Every serious urban farmer eventually reaches the same conclusion: the soil is the investment, and everything else is maintenance.
Building Every Container: The Layer System
This layering system applies to every single container I plant in, regardless of what is going into it. Pechay, bell peppers, siling labuyo, kangkong, anything. The logic is straightforward. Each layer has one specific job, and together they create a growing environment that drains properly, retains the right amount of moisture, and stays aerated enough for roots to breathe. Once you understand why each layer is there, you will never go back to just filling a pot with soil and hoping for the best.
Layer 1: Rocks or small pebbles. A thin bed of rocks goes in first, at the very bottom of the container. The size does not matter much. Small pebbles work just as well as larger stones. What matters is that they create physical air gaps so water can move freely downward after passing through the soil above. Without this layer, fine soil particles migrate to the bottom over time, compact under the weight of everything above them, and create an impermeable barrier that traps water exactly where you do not want it. This single step is the most underrated part of container gardening, and skipping it is one of the most common reasons containers fail silently over time.
Layer 2: Sand. A thin layer of sand sits on top of the rocks and acts as a transition zone between the drainage layer below and the growing medium above. Its job is to prevent soil from filtering down into the rocks over time, which would eventually clog your drainage, while still allowing water to pass through cleanly. A centimeter or two is enough. You do not need much to get the job done.
Layer 3: Composted garden soil mixed with loam soil. This is where the plant actually lives, and the mix matters more than most guides acknowledge. Garden soil on its own is unreliable in containers. When overwatered it compacts into something almost clay-like, and when it dries out it becomes powdery and hydrophobic, meaning it starts shedding water instead of absorbing it. Loam soil corrects both tendencies. When you mix the two together properly, you get a rich, dark brown color, almost black, and that color is your confirmation that the ratio is right and the moisture content is balanced. Chasing that dark color every time you check your containers will keep you ahead of most problems before they even start.
The Color Test: Your Built-In Moisture Monitor
One of the most practical skills you can develop as a container gardener is learning to read your soil by color, and it takes almost no time to get good at it. When the soil in your container is dark brown to near-black, moisture levels are healthy and you can leave it alone. When it starts shifting toward light brown, that is an early warning to water soon. When it goes grayish or pale, you have already waited too long, and the soil may be pulling away from the container walls, which makes rehydration harder because water runs straight down the edges instead of absorbing evenly. The goal is always to water before you hit that pale stage, not after. Once you start checking your containers by color every morning, you will water with much more precision and far less guesswork than any fixed schedule could give you.
Soil Amendments: What I Add and Why
Between planting cycles, or whenever the soil looks like it is losing structure and vitality, I use a handful of amendments that cost nothing because they all come from the kitchen. Used coffee grounds are my most-used tool. I apply them to the surface of the soil, keep everything moist for about two days to let the grounds hydrate and begin breaking down, then mix them down into the second layer rather than leaving them on top where they can form a crust that repels water. This process adds nitrogen to the soil, improves drainage, and helps stabilize the overall composition without the cost or chemical load of synthetic fertilizers. Crushed eggshells go in as well, mixed directly into the growing medium for calcium, which is especially critical for fruiting plants like bell peppers where calcium deficiency causes blossom end rot and ruins the fruit before it matures. Kitchen refuse, vegetable peels, and occasionally animal droppings get composted into the base soil over time, which is exactly the same process that built that 25-year foundation. Slow, continuous, and completely free.
The Drainage Test: Always Do This Before You Plant
Before I put anything into a container, whether it is a trimming, a seed, or a seedling, I run a quick drainage test that takes about thirty seconds and prevents a lot of avoidable problems. The test is simple. I pour water generously over the surface of the prepared soil and watch what happens. If the water drains downward immediately without pooling on the surface, aeration is good and the container is ready to plant. If water sits on the surface and barely moves, the soil is compacted somewhere in the stack and needs to be loosened and remixed before anything goes in. I also run this test periodically on established containers, because soil compaction builds gradually over time and a container that was draining perfectly three months ago may not be draining as well today. Thirty seconds of testing prevents weeks of wondering why a plant is not performing the way it should.
Knowing When the Soil Is Ready: The Biological Signal
Beyond the drainage test, there is a natural indicator I rely on before starting a new planting cycle: spontaneous plant growth. If moss is appearing at the edges of a container and the occasional weed is pushing through the surface, the soil is biologically active enough to support whatever I want to grow next. It sounds counterintuitive to treat weeds as a good sign, but that is exactly what they are in this context. They are living proof that the conditions in that container can sustain plant life. I typically let containers rest for about a month between heavy planting cycles, giving the soil time to recover its structure and biological activity, and by the end of that month the moss and weeds serve as my green light to plant again. This rest period is not downtime. It is part of the system, and skipping it consistently will degrade your soil faster than almost any other single mistake.
The Vertical Tiered Stand: Passive Gravity Irrigation
One of the most efficient decisions I made in my balcony setup was arranging containers on a vertical tiered stand rather than placing them all on the same flat surface. The principle is straightforward. Plants that need more sun go on the upper tiers, shade-tolerant plants go lower, and when I water the top containers, excess water drips down naturally to the containers on the tiers below. In practice, I only need to actively water the top tier. The rest receives passive irrigation from the gravity drip of the containers above it. There are no pumps, no timers, no drip lines, and no additional equipment beyond the stand itself and the containers I was already using. It is a passive irrigation system built entirely from how you arrange things, and it meaningfully reduces the time and water I spend on daily maintenance. If you are working with a vertical stand or even just staggered shelves on a balcony, this is worth thinking about deliberately rather than just placing containers wherever they happen to fit.
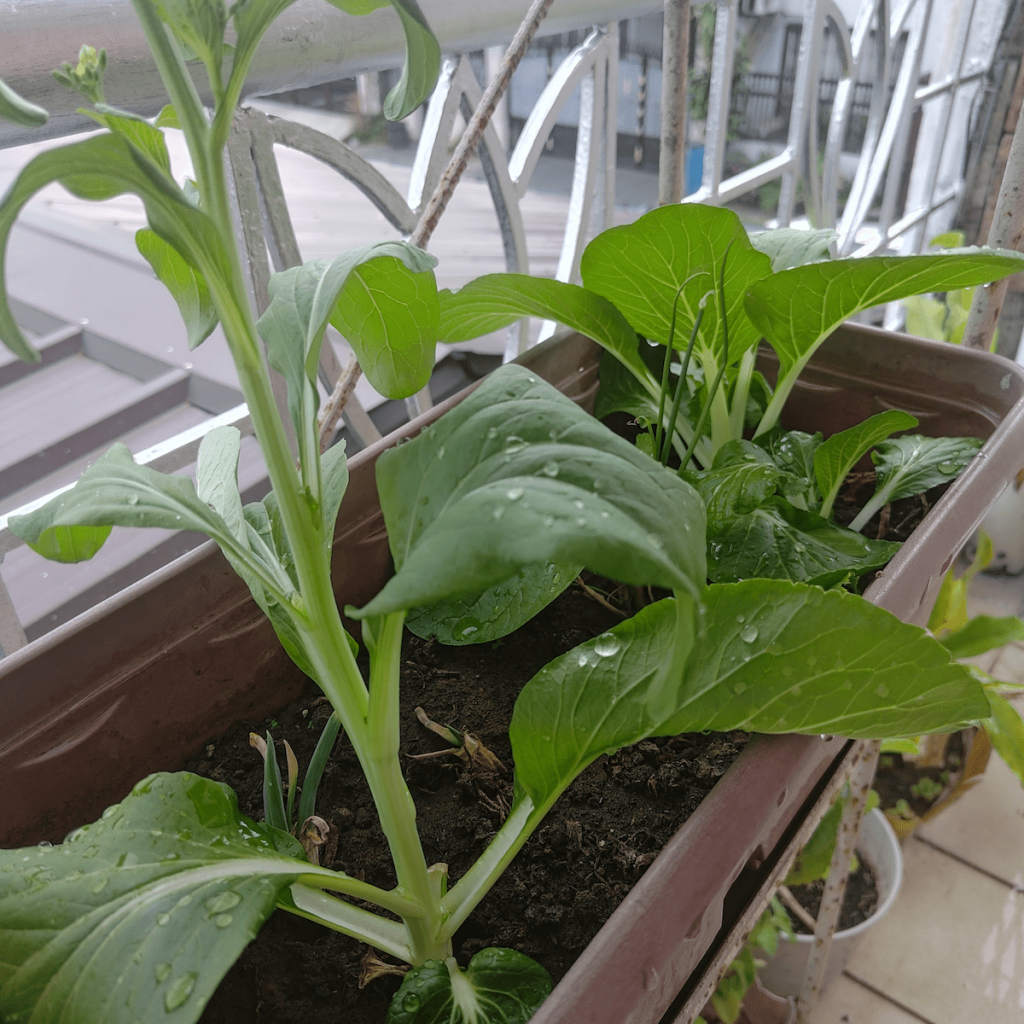
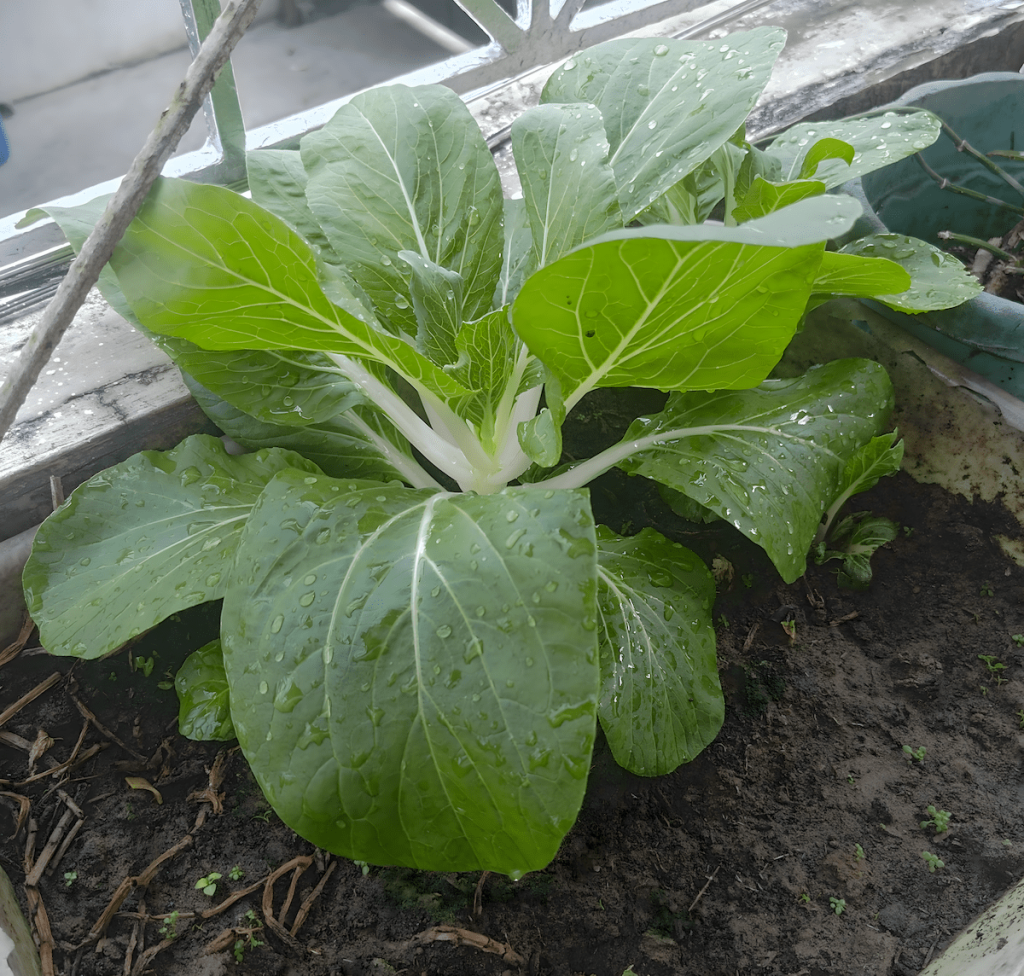
Growing Pechay From Kitchen Trimmings: The Full Process
Pechay belongs to the brassica family, and like many brassicas, the base of the plant retains enough biological energy after cutting to regenerate new growth if given the right conditions. After prepping pechay for dinner, I kept the bottom 2 to 3 centimeters of each base, the part that normally goes in the trash, and pressed them into the prepared container cut side down, deep enough to stay upright on their own. I planted 12 trimmings in one container, positioned it on the balcony where it gets morning sunlight but stays shaded in the afternoon, and watered twice daily: once in the morning and once in the late afternoon before sunset. Pechay can bolt and turn bitter under intense afternoon heat, so the natural shade my balcony provides in the afternoon turned out to be an advantage. By day three, the first signs of new growth were already visible pushing out from the bases. By the end of week one the plants were clearly establishing, and at around the two-week mark I had a full harvest from 8 of the 12 trimmings, a 67% success rate on a first attempt with zero purchased inputs of any kind.
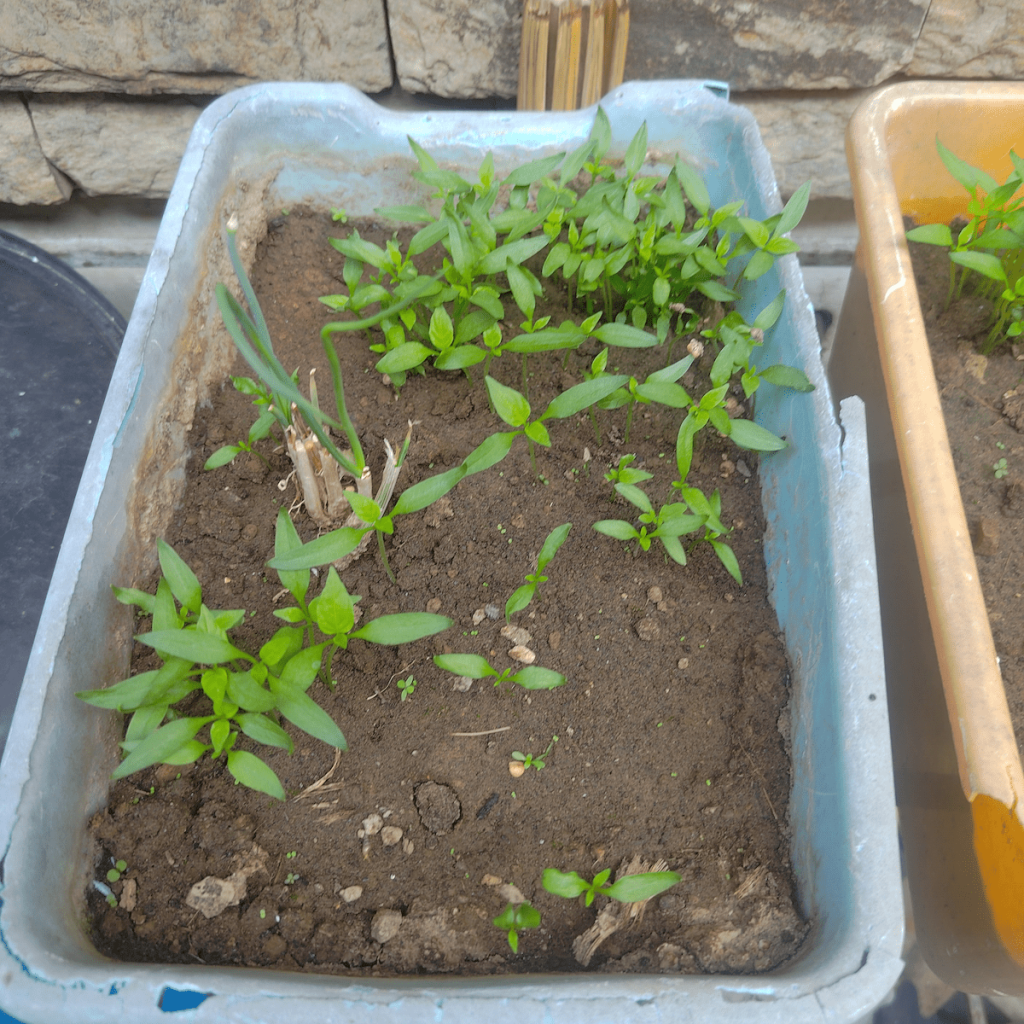
Bell Peppers and Siling Labuyo: Zero-Input Seed Planting
With the pechay working well, I applied the same zero-waste logic to the next round of kitchen scraps. When we had overripe bell peppers, both red and green, I removed the core and sprinkled the seeds directly onto prepared soil in a separate container. There was no pre-soaking, no seed trays, and no special treatment beyond pressing the seeds lightly into the surface. I did the same with siling labuyo: overripe ones from the kitchen, seeds pressed into good soil in their own container with the same layered base as everything else. Both are longer-game plants than pechay. Seedlings appeared at around two and a half weeks, and full harvest runs between 60 and 90 days from the seedling stage. But the process is identical and the material cost is the same: zero. What changes with these plants is patience, not process. The same soil system that produced pechay in two weeks is the exact same soil system that will eventually produce bell peppers and siling labuyo. You are simply waiting longer for the payoff.
What This Whole System Actually Costs
It is worth being explicit about cost because it is one of the biggest reasons people do not start. The rocks for the drainage layer came from the garden, free. The sand was already on hand, free. The composted soil has been building for 25 years from kitchen waste that would have gone in the trash anyway, free. The coffee grounds are used from our daily coffee, free. The eggshells are from cooking, free. The planting material, including the pechay trimmings, the bell pepper seeds, and the siling labuyo seeds, all came from vegetables we were already cooking with, free. The only real costs in this system are the containers themselves, which are a one-time purchase that lasts indefinitely, and the water for twice-daily watering, which is minimal. Once the system is set up and the soil is established, the ongoing cost of running this urban garden is effectively zero. That is not a selling point. That is the actual point of the whole approach.
Coming Next: The Bottle Tower Build
The next project in this series takes the same zero-waste, gravity-fed philosophy and applies it vertically using repurposed 1-liter Coke bottles. The concept is simple. You cut the bottom off each bottle, flip it upside down, poke a small hole in what is now the base, and fill it with the same layered system: rocks, sand, composted garden soil, and loam soil on top. Each bottle becomes a self-contained growing unit, and when you water from the top, gravity moves moisture downward through the layers exactly the same way it does in the tiered stand system. Multiple towers arranged vertically create serious plant density in a very small footprint, all from bottles that would otherwise go into the recycling bin. I have not documented the build yet because I want to do it properly with full step-by-step photos, but that is Part 2 of this series and it is coming. The same principles that made the pechay work will make the towers work. The only difference is the container.
Start With One Container
Everything in this post comes down to one idea: stop seeing kitchen scraps as waste and start seeing them as inputs. The trimmings, the seeds, the coffee grounds, the eggshells are all things your garden needs, and you are producing them every single day whether you use them or not. Build one container with the right layers, use your pechay trimmings as your first planting material, water it twice a day, and read the color of your soil every morning. That is the whole system. The complexity people associate with urban farming usually comes from trying to shortcut the fundamentals, buying solutions instead of building them, and using products instead of understanding processes. When you understand why each layer is there and what your soil is telling you, the whole thing becomes intuitive, and you will start looking at every kitchen scrap differently from that point forward.
For the health and nutrition side of this project, including why homegrown pechay is nutritionally superior to store-bought, what siling labuyo does for your body, and the mental health benefits of tending a garden, read the companion post at HealthyForge “From Kitchen Scraps to Dinner Table: How I Grew Pechay, Bell Peppers, and Siling Labuyo on My Balcony“.